More About the Girls

Showing posts with label halloween. Show all posts

Thursday, October 4, 2012

It's TiMe for a SpOokEy, CrEePY FaLL Blog Hop!

Welcome to the Altered Pages Halloween/Fall Blog Hop!!
WARNING! WARNING!
BEWARE OF PROJECT OVERLOAD!!!
You've been warned...I went a little overboard for this hop & wanted to apologize for any overwhelming qualities on this post! LOL!!

First of all, let me get the specifics outta the way...
Hopefully you've joined me here via the Altered Pages BLOG & have started from the beginning cuz each of the designers are giving away a Halloween-themed digi-collage sheet to TWO winners, courtesy of Altered Pages (THANKS JEAN!!) by leaving a comment on each blog & becoming followers!
In addition to that, Jean is also giving one lucky winner a Pink Scissor Mouse, so be sure go back to the beginning & leave a comment that you finished the hop & left comments/follow along the way!

AND...could it get any better?!!
YES! It CAN!!
I am also giving away some blog candy...a kit to make my "Skeleton Stomp" Domino Book that is for sale on the Altered Pages website (contents vary slightly)!!! Just be sure to leave a comment telling me which project you liked best & you'll be entered in a random number drawing for it! YAY!!
...now let's get down to it!!!!
I simply ADORE this time of year with all the GORGEOUS color around us! Not to mention how fun it is to decorate & dress up for Halloween!!! So that's pretty much why I went WAY overboard for this hop! I just couldn't stop myself!!!

So, this is my "hall tree" where we usually hang our coats, but since I don't have a fireplace mantel, it's become my substitute for displaying collections like this!
See what I mean?? Craziness, huh?!
{There are a few things up there that I had created a month or so ago & you can read about those here: (the green dressform) & HERE (the little skeleton tin)...}
For this Hop, I started with an image from the Wicked Witches collage sheet that I simply cropped out & added to the saying "Keep Calm & Ride On!" (I even made one with a turkey from the Gobble Gobble sheet that says "Keep Calm & Gobble On" to change out next month!

I also made a set of bottles using the Macabre Page Image  as my template to create some spooky labels:
Witches Brew
Ravens Blood
Siren Song Elixer
 The Siren Song Elixer is my favorite!!! I used  a couple collage sheets of some VERY saucy women & a little bit of German Scrap!! (Laying Down on the Job & Erotica)
The Ravens Blood one has cutouts of ravens here & there from the Poe's Raven sheet.
Last is my MOST favorite!
I have never made Tussie Mussies before, but decided to give it a try! 
If you look closely, you'll see that I used ENTIRE collage sheets as patterned paper for the cones!! How clever am I?!! LOL!!
I used four different sheets to make the cones:
Here are some close-ups of the embellishments themselves:
Whew!
On top of all that I made a wreath too...you can see it HERE!
That's it, REALLY!
Hope you had fun looking at my projects today! Don't forget to leave a comment about what you liked best so you can be entered into the contests!

OH- ONE MORE THING!
We are starting another challenge on Monday, 10/8 with an AWESOME prize pack, so be sure to check in on the Altered Pages Challenge Blog for more details!
Cheers!
Don't forget to keep hoppin' around!


Thursday, September 6, 2012

An Etsy Shop Update...SALE!!!

Just a quick little note to tell you about a SALE going on
in our Etsy shop until OCT. 31st!
ALL Halloween items in our shop will have FREE SHIPPING through 10/31/12!
**That's a pretty awesome deal for these larger scrapbooks!!!**


You'll find these fabulous items HERE, along with some cards just for Halloween!

Also, just had to share that my little French-themed Domino book sold yesterday! 
YAHOOO!!!
I hope the new owner love is as much as I do!!
Have a wonderful Thursday!
Cheers!
 

Wednesday, September 5, 2012

It's all about the dress-form!

We just can't seem to stop playing with these things!
The paper mache dress form is so FABULOUS!!!
If you didn't see my post a couple of weeks ago when mom, Kim & I (oh, and the Magpie!) got together to create Halloween-themed dress forms, you can see my spin on it HERE.

Mom finished hers up last week & I just got around to taking pix of hers & the Magpie's.
Still waiting for Kim to release hers to me!! Such a perfectionist, that one!
Without further ado...

 Mom's lovely Halloween Girl:
 
And here's the Magpies version...
We glued them onto various candlesticks before we realized that if we had purchased them at JoAnn's instead of Michaels, they are already attached to a paper mache stand! 
JoAnn's dress form
UGH! Live & learn, right?!
Come back soon...we have even MORE dress forms to share...
this time we got a little "Steampunkie!"

Happy Wednesday!
Cheers!


Tuesday, August 21, 2012

some news to share...

Just want to toot my own horn...I am FINALLY a Somerset Studios published artist!!
See my post over at My Laughing Magpie...
HERE

Cheers!

Saturday, August 18, 2012

The Altered Spoon, a Blog Hop!

Good Morning, Afternoon or Evening to you, depending on where you hail from!!
Hope you are having fun hopping along with this Altered Spoon Challenge hosted by Susan Brown of SBArtist: Painting in the Dark! Happy 5 yr Blogiversary to her!!!
My name is Becky Voth & I am a design team member with Susan over at AlteredPages.com! I am also a mixed media artist living in Colorado. I like to work with all kinds of materials & for this challenge, I had so much fun, that I made TWO completely different spoons! I hope you find them inspiring!

First, I wanted to make one in a Halloween theme, but not your typical witches, ghosts & goblins type of Halloween theme!
My 6 yo daughter has decided that she will be a Fairy this year for Halloween!
So, I made this spoon to hang in her room after Halloween.
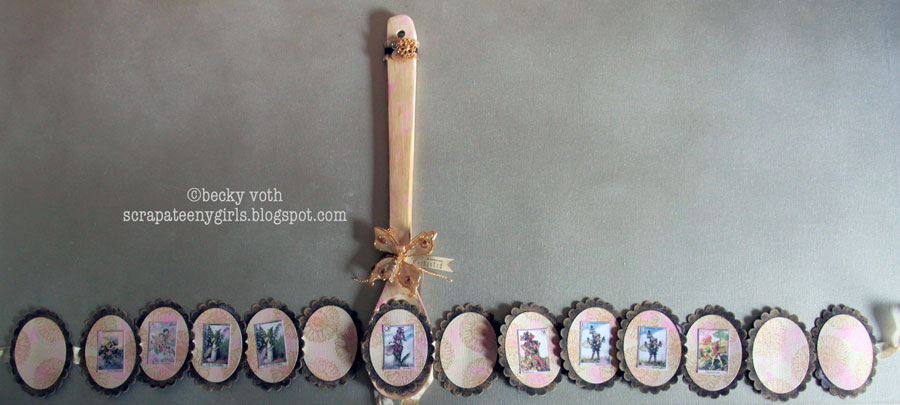
The scalloped brown oval is actually an accordion mini-album. I made it using the tutorial by Michele Kovack on her blog called Thoughts of a Cardmaking Scrapbooker as my guide, but I tweaked it a little. {You can find it here.} BUT, instead of making a little book that opens one way like she did, I had to make it more complicated & have it open both ways! So, when you open the book, this is what it looks like...
I left a couple of blanks for photos of my daughter & the rest of the images are from the Fairy Alphabet collage sheet at Altered Pages, spelling out Hall-o-ween.
{I used brown Co'odinations cardstock for the scalloped ovals (cut from a Spellbinders die & then sanded), layered with cream Bazzill Bling that I stamped & embossed with a Stampin' Up Mum stamp. After I added the little Fairy images, I used my finger to add some light pink here & there. I painted the whole spoon a pearly cream & also stamped the mums on the handle of the spoon & a little pink here & there too. It took a little engineering to figure out how to keep the book all together while it hangs on the wall - I added a 2nd length of seam binding onto the bowl of the spoon before attaching the book to the spoon. Then when I fold up the pages, I run the new ribbon under the cover of the book before I tie it all off together - giving me a double bow.}
It will be fun to add tiny pictures of my own little fairy later this year - as long as she doesn't change her mind! Then it will go up for sale on Etsy!! LOL!

And now for something COMPLETELY different!
My Angel Spoon!
I sanded the spoon a little & then hit my stash of vintage & altered goodies to "collage" linen, lace, scrim, appliques & rhinestone buttons onto the spoon. The image is again from Altered Pages, Renaissance Angels.
{Although, she looks a little bit more like a cupid, I thought she was prefect!!}

I used an oval embossing frame from Stampin Up & cut out the ovals with my Spellbinders Ovals again; glued them together & set it aside while I finished the lace work. When the handle of the spoon was dry, I glued her on with a couple of layers of 3D tape behind her so she wouldn't sink into the bowl of the spoon. Lastly, I added the angel wings.  {From Michaels in the doll-making aisle!} How PERFECT are they!!!
{I spritzed them first with some Glimmer Mist to age them a little bit.}
Here are a couple of close-ups of the top & bottom of the spoon...

I am totally in love with this girl now!!
Hope you had fun looking at my Altered Spoon Creations & I would love to hear your thoughts & have you as a follower!!

Below is the linkz to check out more artists creations & we'd love it if you'd play along too!
Cheers!


Presenting the artistes de spoon...


Thursday, August 9, 2012

It's all the Ra...ven

Ever have one of those days where you are super excited to sit down & CrEaTe something that has been rattling around in your head for days? Well, today was supposed to be one of those days. Instead, it was one of THOSE days!

Maggie was out all day at a swim park with friends...I ran a couple "quick" errands, as if going to Michaels is ever quick! And then had plans to sit at my desk ALL day & create a FABULOUS Halloween bottle so that I could make MORE fabulous Halloween bottles for a tutorial...well, my mind just couldn't tell my hands how to accomplish what it wanted!

So, below is what I worked on for several hours today & I am STILL not done, nor am I thrilled with the results so far...
The bottle on the left was my first attempt for the Ravens Blood bottle, but the colors were off, so I made the one on the right. It's better, but not finished.
(Raven collage sheet; I made my own labels using the Macabre Page collage sheet)
I wanted to whip through this bottle, so that I could get to what I REALLY wanted to play with today:
I have been watching videos for DAYS & am just itchin' to start playing with this Gelli Plate I got from Altered Pages!! Alas, it wasn't in the cards today!

But YESTERDAY was a totally different day!
I got together with mom & Kim to make some spooky mannequin girls inspired by Ranger's CHA 2012 Winter Designer Challenge that was featured in Somerset Studios this month. I had an idea in my head & I have to say, it came together quite nicely!!
This is my 
RAVEN MAVEN!
We started with a paper mache dressform from Michaels. I covered mine in black tissue paper & decoupage'd over her.  I added the feathers along the back of the neck - a feather pc meant for a mask that I cut in half, also at Micheals. Then I just started adding layers of tissue paper, lace, tulle & netting from a vegetable bag! The final touches were the Tim Holtz "31" placard, the wings on her back & the Raven on her shoulder!
Mom & Kim's weren't done yet, so I will post theirs when they finish them! What fun!!
I have a cool Halloween project that I'll be posting on the Altered Pages Blog next Tuesday, so be sure to stop by there & check it out!
That's it for tonight!
Nitey-nite!