More About the Girls

Showing posts with label Christmas. Show all posts

Saturday, August 18, 2012

The Altered Spoon, a Blog Hop!

Good Morning, Afternoon or Evening to you, depending on where you hail from!!
Hope you are having fun hopping along with this Altered Spoon Challenge hosted by Susan Brown of SBArtist: Painting in the Dark! Happy 5 yr Blogiversary to her!!!
My name is Becky Voth & I am a design team member with Susan over at AlteredPages.com! I am also a mixed media artist living in Colorado. I like to work with all kinds of materials & for this challenge, I had so much fun, that I made TWO completely different spoons! I hope you find them inspiring!

First, I wanted to make one in a Halloween theme, but not your typical witches, ghosts & goblins type of Halloween theme!
My 6 yo daughter has decided that she will be a Fairy this year for Halloween!
So, I made this spoon to hang in her room after Halloween.
The scalloped brown oval is actually an accordion mini-album. I made it using the tutorial by Michele Kovack on her blog called Thoughts of a Cardmaking Scrapbooker as my guide, but I tweaked it a little. {You can find it here.} BUT, instead of making a little book that opens one way like she did, I had to make it more complicated & have it open both ways! So, when you open the book, this is what it looks like...
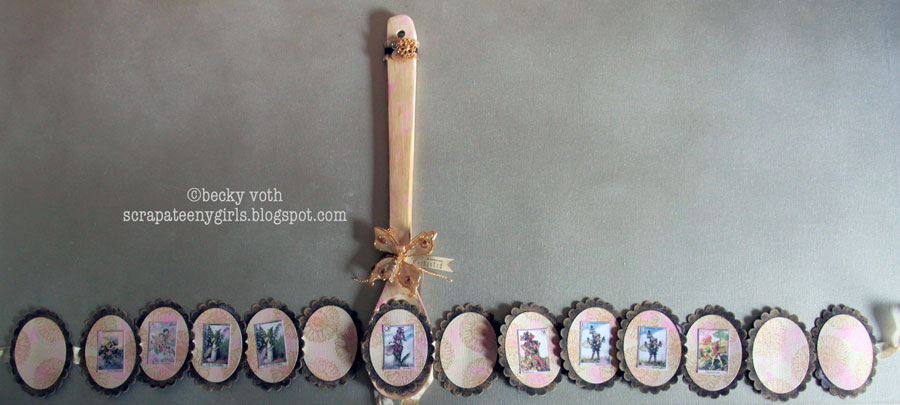
I left a couple of blanks for photos of my daughter & the rest of the images are from the Fairy Alphabet collage sheet at Altered Pages, spelling out Hall-o-ween.
{I used brown Co'odinations cardstock for the scalloped ovals (cut from a Spellbinders die & then sanded), layered with cream Bazzill Bling that I stamped & embossed with a Stampin' Up Mum stamp. After I added the little Fairy images, I used my finger to add some light pink here & there. I painted the whole spoon a pearly cream & also stamped the mums on the handle of the spoon & a little pink here & there too. It took a little engineering to figure out how to keep the book all together while it hangs on the wall - I added a 2nd length of seam binding onto the bowl of the spoon before attaching the book to the spoon. Then when I fold up the pages, I run the new ribbon under the cover of the book before I tie it all off together - giving me a double bow.}
It will be fun to add tiny pictures of my own little fairy later this year - as long as she doesn't change her mind! Then it will go up for sale on Etsy!! LOL!

And now for something COMPLETELY different!
My Angel Spoon!
I sanded the spoon a little & then hit my stash of vintage & altered goodies to "collage" linen, lace, scrim, appliques & rhinestone buttons onto the spoon. The image is again from Altered Pages, Renaissance Angels.
{Although, she looks a little bit more like a cupid, I thought she was prefect!!}

I used an oval embossing frame from Stampin Up & cut out the ovals with my Spellbinders Ovals again; glued them together & set it aside while I finished the lace work. When the handle of the spoon was dry, I glued her on with a couple of layers of 3D tape behind her so she wouldn't sink into the bowl of the spoon. Lastly, I added the angel wings.  {From Michaels in the doll-making aisle!} How PERFECT are they!!!
{I spritzed them first with some Glimmer Mist to age them a little bit.}
Here are a couple of close-ups of the top & bottom of the spoon...

I am totally in love with this girl now!!
Hope you had fun looking at my Altered Spoon Creations & I would love to hear your thoughts & have you as a follower!!

Below is the linkz to check out more artists creations & we'd love it if you'd play along too!
Cheers!


Presenting the artistes de spoon...


Monday, November 21, 2011

Craft Show Picts

Thanks to those of you who came out the Castle Rock yesterday to show your support at our first craft show! And thanks to those that sent their virtual hugs to us as well!!

The show went fairly well! We sold a few items & made about what we were expecting to & a good "source" tells me that we did pretty well considering there were TONS of commercial-type booths there (Arbonne, Pampered Chef, people selling stuff made in China, etc.)! We are hoping to squeeze in another one before the Holidays if possible - more of a Handmade fair would be nice!

So, here are some photos of the booth - we were told ours was the best, but I think our friends are a little biased! ;D

Our spaces consisted of half of a 10 ft lunch table - we wish we would have purchased 2 tables & were able to spread our wares out more! but we made due with my extra table!
 We had LOTS of light around us with all the windows, but didn't make for the best picture here! HA!
Kim, Mom & Me
We made a few German-Inspired Wrapped Christmas Trees, which were a BIG hit!
Cards & stamps - not as big a seller as we thought they'd be!
Some of Mom's adorable purses!
Afterward we had loaded the car, paid the tax man & unloaded at Kim's, we three headed into Downtown Castle Rock for a wander through the Barn, see the Starlighting & have a cocktail or two at Sienna's.
Here's a few of the Pictures from around town...I will post the Barn pictures later (I took some pix in 2 of our favorite shops!)
Carolers

Quintessential Nativity Scene outside the Church!
The Star is Lit atop the Rock!
 

Outside the Barn - quirky, but cute!
The Fountain outside Sienna
 
Pretty Garland by our spot in Sienna
That's it for now. Gotta get Maggie to school & finish my list of chores! (Laundry, packing, Christmas decorating, cleaning, clean out car, put stuff up on Etsy...in no particular order!)
Have a wonderful Monday!
TTFN!

Friday, November 18, 2011

A Joyful Canvas

Ok, here's the other reverse canvas I just finished. 
What do you think?


I had a good time going through my stash of vintage ephemera to build up the dimension on this one! The Santa image is attached with photo corners, so the buyer can replace it with a family photo if they wanted. I might just have to make a few more of these reverse canvases cuz they're so much fun!!! {A tad smaller though! This one is 16x20 like the Noel canvas! Sure hope they sell locally, cuz I'd hate to figure out how to ship these on Etsy!}

That's it!
This will probably be my last post until after the show on Saturday & I can't guarantee that I will post until early next week, but I will try!

Again, we really hope to see some of you locals there! It's our first one & probably a trial-run for future shows! So come tell us what you think!!
We found out that we will be in the left-hand corner as you enter the room at Castle View High. {Hope it's a good spot!}
There appears to be over 40 vendors!! Yeah!!

Here's the scoop again!
Holiday Craft Bazaar @
Castle View High School
5254 North Meadows Drive, Castle Rock, CO 80109
Saturday, 11/19 from 10am-2pm
Benefiting the Booster Club
Door prizes, food & holiday gifts to be had by all!!

Friday, November 19, 2010

Apron Card Kits Now Available!!

Just an idea of what you can do with this kit!
Just a quick note to let you know that we finally got our Apron Card Kits up on Etsy today!
These kits would make GREAT TEACHER GIFTS & super easy to put together! (They can be as simple or as elaborate as you'd like to create!!)

All the text  & little cards created with stamps from the kit!

Check it out HERE
**If you buy 2 or more kits, we'll include a
free coordinating stamp!!

Wednesday, November 17, 2010

Creative Cuts & More Christmas Hop


Thanks for joining us today for the
Creative Cuts & More 
November Blog Hop!
Today the Creative Cuts & More talented designers are sharing some more fabulous Christmas projects with you!
So, settle on in & hop along with us!

Hopefully you started at the beginning & hopped along from my sister, Becky's, blog to get here (she's so creative, don'tcha think!).  If not, you really don't want to miss what all these designers have done for you today! So start HERE & work your way back to me!
OH! I almost forgot! What would a Christmas Hop be with out a little CANDY?!!
CC&M is giving away this fabulous Christmas Card Kit (a $29.99 value)!
One lucky winner can get a huge jump on making those fabulous Holiday cards simply by doing the following:

*Leave a comment on EACH designers blog
*Leave a comment on the Die Cut Diva Blog after you've finished hopping to let us know you've completed the hop!

I've got 3 little projects to share with you today, so grab a cup of coffee & settle down to share some fun holiday projects with me!
A small tablescape, pretty little packaging & a recipe apron card

Let's start with the little Tablescape I made...
This is simply the Rectangle Accordian Mini-Album w/Layers stamped with some religious Christmas stamps that I embossed with copper & stretched out to stand up. I only used the layers sporadically because I love green so much! (it's the Bazzill Canvas in Leapfrog with the layers in Copper Stardream Metallic)


On the back I stamped the word "Rejoice" & embossed it again in copper. I plan to place the among some little poinsettia's on my table this year. (the trees are from my stash)

Next, I made this fun little treat box out of the Peek-a-View box in "Lapis Laxuli' Stardream Metallic cardstock...
These boxes are super fun & easy to put together with the Tacky Tapes & are going to be so great to full with goodies for teacher or neighbor gifts!!
I attached the cute little snowman inside the bottom of the box & the mittens on the outside edge (all from my stash) to give it a little more dimension.
Isn't it fun!! I only filled it up a little bit, but imagine how fun it would be to fill it all up & have the snowman appear as the treats are gobbled up!!!

Lastly, I made another one of these great Apron-Recipe Cards...
I love these aprons! They make such great little "Gift" cards because you can totally add a few recipes for a sweet little "neighbor" gift! You could even make up a few extras for those "emergency" gifts!
 I couldn't resist using some kitschy little domestic images on this one & it simply "said" pearls to me, so I added the string of pearls as the apron strings!

That's it!
Hope you enjoyed my little projects!
Now, HOP on over to my Noelle's blog to see what little treasure she has in store for you! But don't forget to leave a comment for your chance to win the Christmas Card Kit!!
See you next time!
- Kim