More About the Girls

Tuesday, July 13, 2010

And the Winner is...

Thank you to everyone for participating in the Die Cut Diva / Creative Cuts & More July Blog Hop!!
It was great fun & very inspirational, don't ya think?!

I picked a winner out of the bucket today for our own giveaway of one of the great Christmas Kits from our Etsy Shop...

And the winner is...

Congratulations Jenny from CT!!!

Thanks so much for playing with us!
Please contact us with your mailing address & we'll get the
"Dash Away All" kit off to you this week!!
Thanks again everyone for all your wonderful comments about the hop & projects!

Keep an eye on the blog here - NEW things to come & I might need your input on some of them!!!

Monday, July 12, 2010

It's Christmas in July!!!

Welcome to another great Creative Cuts & More blog hop!!
AND hoppers can have a chance to win this FABULOUS Christmas Card Kit (as well as a chance for a kit from us - The Scrap-a-Teeny Girls - by leaving a comment here!)  Keep reading to find out how to win both of these great prizes!!

Everyone seems to just love Christmas time! And, it's never too early to be working on those goodie boxes & gifts or just simply working on your favorite pix, thinking of the nice cold weather during these hot summer months!!


Hopefully you've followed the links & came to us via Steph Zerbe's beautiful site! Amazing work huh?! You will definitely want to peruse her archives for even more inspiration!!  If you didn't arrive here from Steph's blog, you don't want to miss what all our designers have in store for you! The CC&M "Christmas in July" Blog Hop starts at the Die Cut Diva blog first.

If for some reason one of the links is broken along the Hop do not worry, HOP back over to Die Cut Diva where you will find the complete list of all our bloggers!

Let's get started...For this month's project, I wanted to work with the Pyramid Box & the Pyramid Flat Top Box.  I knew that I could layer these two to make a fun Christmas Tree with a hidden treasure inside!


After monkeying around with the image of my daughter in PSE, I cut various papers from Making Memories "Fa La La" collection & some fantastic BoBunny paper called "St. Nick in Toyland" (available in one of our Christmas kits on sale in our Etsy shop!) into the triangle shape for the top of the tree. I used the fabulous Killer Red Tacky Tape in 1/4" to put the pyramid all together. Once that was done, I inked the edges of all the paper triangles with TH Walnut Stain Distress Ink before adhering the paper to the pyramid. I just love that pic of my daughter hugging Santa!!! (For those that live in the Denver Metro area, The Barn at Castle Rock has the greatest Santa, you can take your own photos & NO lines!!! All for FREE!!)
 

For the bottom, Flat Top Pyramid Box, I first used Olive Vine & Sunflower Glimmer Mist (I think I might be becoming a GM addict!) to get the same tone of green in the paper's I was using. I rubbed on a little image from Webster's Pages "Ting-a-Ling" collection on the front, a little "25" cut out from a piece of the MM "Fa La La" papers & glued it all together (including the lid to the top Pyramid) with more of the Killer Red Tacky Tape! Next, I used more of the Killer Tape to run that FABULOUS fiber across the top (also from Webster's, but unfortunately we sold out of those kits! SPEAKING of kits...we'd like to GIVEAWAY Christmas-themed kits one of our great to one lucky reader! Just leave a comment at the end of this post, telling us which kit you'd like of the 4 in our Etsy Shop & we will randomly select a winner!!)


Even though I wired the top & used a little ribbon from my stash, because of the hidden treasure inside, the tree is really too heavy to hang. (Also, if you use this pyramid box as an ornament, be sure to punch through all your holes in the flaps inside BEFORE adhering all the triangles together! I found out the hard way that I couldn't get through all my holes because of the way I sealed it up! Hindsight!!)


My little "treasure" inside, is just that...a little book of some favorite memories of Maggie during the 2009 holiday season! After printing a contact sheet (this is a great way to get tiny pix for these kinds of projects all at once!) in PSE of the photos I wanted to use, I cut all my papers from the Webster's Pages "Ting-a-Ling" & "Winter Wonderland" collections, as well as some more of that great BoBunny paper roughly into a 2x2 inch squares & whipped it out in no time!

If you'd like to see more of the inside of this tiny album, scroll on down! If you've seen enough & want to move on to the next blog in our "Christmas in July" Blog Hop, click HERE to see Jan Tantatomir's amazing projects as our July Guest Designer for Creative Cuts & More! She really has a beautiful touch! Hope to see you soon! (BTW, we do this every month!)
AND, don't forget to follow the instructions below on how to WIN the CC&M Christmas Card Kit & be sure leave a comment to WIN one of OUR Christmas kits (let us know which one you want too!) from our Etsy Shop!!

For the CC&M prize PLEASE do one or all of the following...

(A) Leave a comment on Die Cut Diva Blog. (This is limited to one per person unless you meet the criteria of B, C, and/or D below.)

(B) Leave one extra comment there if you've posted a link to the blog candy on your own blog. Make sure to include a link to your specific post in your comment.

(C) Leave one extra comment on the Die Cut Diva if you become one of our blog followers. See the right-hand navigation column to follow us.

(D) Leave one extra comment if you click over to our new page on Facebook and become a fan.

(E) Leave one extra comment by commenting on ALL of our talented Designers in our Blog Hop! (This final "rule" will also serve as the Scrap-a-Teeny Girls' contest comment as well, so just leave the ONE comment for us to win our Christmas kit!)


Oh, I almost forgot!
You don't want to miss the August Creative Cuts & More Hop! We'll be doing some amazing Wedding & Baby ENSEMBLES!
So, stay tuned!!!

Ok, if you're still reading...here are some more photos from the mini-album. I really tried to keep it simple, with the exception of a little accordion fold inside to allow for a few sequential photos. Like I mentioned above, I used mostly the Webster's papers, but threw in a few others from my stash. You'll see a couple of those great rub-ons again as well as tons of dymo labels! I LOVE my WRMK label maker with all the different font wheels (Dymo makes one now too)!!! Let me know if you want any info on anything I might have missed telling you about here! Enjoy! And thanks for reading!


 TTFN, Becky!
PS - Kim had to skip the Hop this month because she is recovering from ankle surgery. But she will hopefully be working on some projects for our regular posts on the Die Cut Diva blog over the next two weeks! And she's got some great things planned for the Creative Cuts & More August Hop!!

Friday, July 9, 2010

Christmas in July?!


I know it's super early to think anything about Christmas, but we're doing some great projects with Terry over at Creative Cuts & More for the July 12th Blog Hop!

You'll see lots of creative ideas from goodie boxes & bags to ornaments to cards! So be sure to stop by & check it out!!

PS - Kim is off this month...she's having surgery this afternoon on her ankle, so please keep her in your thoughts!

See you soon!

Sunday, June 13, 2010

CC&M's June Blog Hop!

Happy Flag Day to everyone!!
Becky here again (you'll find I do most of the posts with Kim & Mom over my shoulder! LOL!!),
Here we are for another fun BLOG HOP with Creative Cuts & More!!


Hopefully you've followed the links & came to us via Lisa Sommerville's beautiful site! Amazing work huh?!  If you didn't arrive here from Lisa's blog, you don't want to miss what our designers have in store for you! The CC&M June Blog Hop starts at http://die-cut-diva.blogspot.com/. (My sis, Kim has a great Revolutionary War album at the beginning of the hop & there are some more photos at the end of this post! You don't want to miss it!)

If for some reason one of the links is broken along the Hop do not worry, HOP back over to Die Cut Diva where the complete list will be.

This month's theme? Patriotic & Picnics!
What better time to get ready for all those summer BBQ's & the Fireworks on July 4th than to make up a little card & favor ensemble?!?!


 I think we tend to forget that a lot of these cards & favors are not meant to be kept forever & tend to only use our scrapbook supplies for them - they don't HAVE to be acid-free all the time!
But for the invitation, I punched 2 different sized stars w/my Fiskars punches out of some flag-decorated paper plates! (I would have asked for some CC&M starsCC&M card to work with, but I had no idea what I was doing when I placed my order for the Hop!)  Then I sanded them a tad & adhered them to a piece of white cardstock that I had already stamped with the Tim Holtz "sun rays" stamp. You'll also notice that the edges look burned?  Well, they are! I blasted back to my 4th grade history class where we burned the edges of paper to make scrolls with a match! What fun!!  Attached all that to a square in Bazzill Blue Canvas Textured Cardstock, added the dymo label & VIOLA! A great little invite ready to send out! (Inside is another "torched" piece of paper with all the party details!)

The card was fun, but this is what I am most excited to show you...
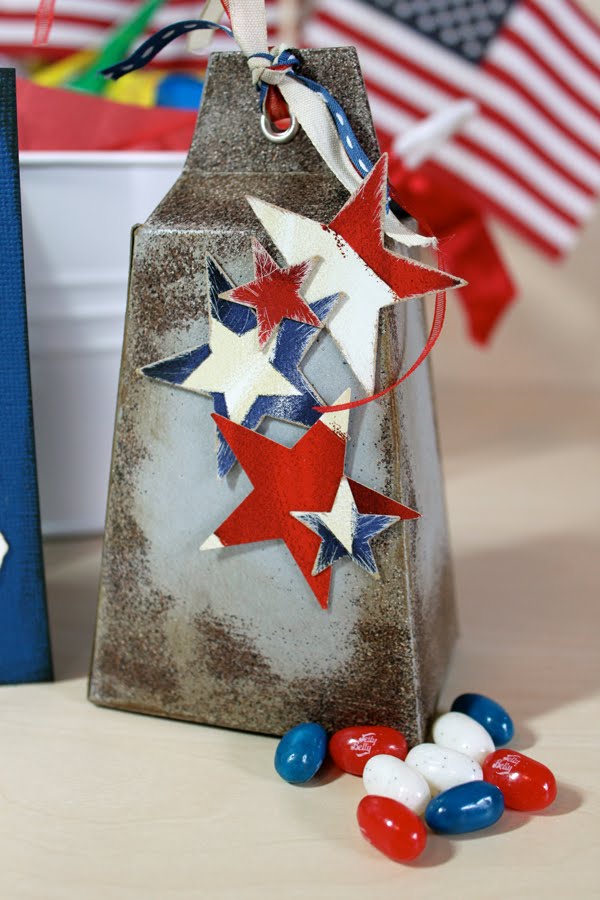
This "Dinner Bell" Favor was made from the CC&M Bell Box in the Galvanized Silver Metallic paper! Isn't it awesome! (I'm very proud of it!) 
Here's what I did to get the rusty look...

1. I mixed 3 colors of embossing powder - Zing's black & chestnut with Stamp-n-Stuffs copper (not much copper) & tested the look on some scraps until I achieved a "rusty metal" color.
2. I stamped embossing fluid just on the edges & corners of each side of the bell as well as the top, 
3. I sprinkled the powders on & heated it all up. 
4. Once it was cool, I sanded away some of the embossed areas & went over all of them with Tea Dye Distress Ink, but wiped some of it off with a paper towel (the ink will only stick to the paper, not the powder, so that it sinks into any areas missed with the powders from the beginning).
5. I assembled the box by simply folding it all together & gluing along the on edge.
6. I punched some more stars out of the dinner plates, sanded & glued them on.
7. I used my Crop-a-dile to attach the large eyelets in the top & tie some red, cream & blue ribbon from my stash through the holes.
 That's it! That's how I achieved my "rusty" Dinner Bell look for the favor box full of YUMMY red, white & blue Jelly Bellies!!

Hope you all enjoyed my post!
Now, you can either scroll on down to see some close ups of Kim's amazing Revolutionary War album, or KEEP HOPPIN' on over to Noelle's blog to see what she has up her sleeve this month!

Thanks for Hoppin' By!

Here are the close-ups of Kim's SUPER creative uses for all her CC&M Dies (You can find all the links on the Die Cut Diva Blog)!!!
 MOVIE CAMERA
BUCKLE & NAMEPLATE
ANOTHER BUCKLE
HINGES ON TAB!
STAR SHOOTING GUN!
HINGES AS A BANNER!
MY FAV- HINGES AS A FLAG POLE!
COOL ACETATE STAR!
MY ADORABLE NEPHEW IN
AN ANTIQUE FRAME!
THOSE GREAT FILMSTRIPS!
A CARD ON A SCRAP-
BOOK PAGE! 
(Altered with Glimmer Mist)
MORE FILMSTRIPS!
ANOTHER NAME PLATE
ANOTHER BUCKLE!
(also Glimmer Misted!)
AND LASTLY,
THE SCHOOL HOUSE!

Hope you enjoyed our projects! Please feel free to ask any questions about what or how we did something!
For next month's CC&M Hop we'll be thinking cool thoughts with CHRISTMAS IN JULY!
(We'll have a giveaway on next month too!)
But I hope we'll see you before then!
Cheerio!

Tuesday, June 8, 2010

June Blog Hop Coming!


Our next blog hop with Creative Cuts & More & their Die Cut Diva Blog is coming up & we hope you'll join us for this one! There will be some great summer & patriotic ideas to get your crafty on!
See you soon!